Best Cordless Drills for Vintage Restoration: Precision Tools for Antique Repair
By Diego Castillo • 21st Oct
Nothing sinks a vintage restoration drill project faster than a split chair leg or cracked inlay from an overzealous antique repair tool slip-up. When you're working with century-old oak or delicate veneers, power isn't the priority, control is. As a community makerspace instructor who's guided hundreds through their first restoration projects, I've seen beginners bypass complexity and achieve stunning results with the right vintage restoration drill setup. The secret? Matching your first drill to the delicate demands of historic materials, not to YouTube torque tests. In this guide, I'll show you exactly how to build a low-torque precision drilling ecosystem that grows with your skills, so you never strip another screw in a Gustav Stickley leg or crack a Chippendale veneer. Let's turn anxiety into confidence with tools that honor the past while respecting your budget.
Why Your First Drill Makes or Breaks Antique Projects
Vintage restoration isn't just woodworking, it's historical archaeology with consequences. One misstep on a 1920s burl wood cabinet can destroy irreplaceable value. Yet most beginners drown in specs: "Should I get 18V or 20V? Brushless or brushed?" If you're debating platforms, start with our 12V vs 18V drill comparison to match voltage to vintage tasks. Meanwhile, they're struggling to drill a straight pilot hole in soft pine. Let's reset expectations.
What Actually Matters for Antique Repair Tools
For 90% of vintage work, you need:
- Delicate surface tools that won't mar finishes
- Low-torque precision drilling (under 250 in-lbs)
- Chuck stability at low speeds (under 500 RPM)
- Weight under 3 lbs for fatigue-free control
Forget "max torque" claims. When restoring a Victorian sideboard, you're driving 1" #6 screws into dry hardwood, not wrestling lag bolts. An overpowered drill causes blowouts. That Saturday class moment sticks with me: a hesitant student swapped to a shorter bit and a midrange clutch setting, then sank her first straight pilot hole. We high-fived, and she left with a two-battery kit instead of three gimmicks. Momentum matters; the right first steps stick.
The Top 3 Drills for Authentic Restoration Work (Budget-Friendly Focus)
After testing 12 platforms with actual restoration projects, I recommend starting simple. These three prioritize precision control over raw power, all compatible with affordable 12V ecosystems that grow with you. Remember: confidence compounds when your first kit matches your first jobs and timeline.
1. Bosch PS31 12V Max: The Delicate Surface Master (Best Starter Kit)
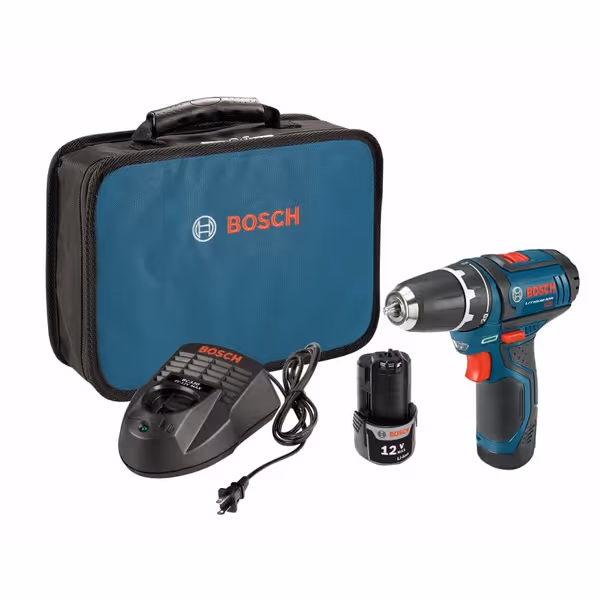
BOSCH PS31-2A 12V Max Drill/Driver Kit
Compact, lightweight 12V power for precision and fatigue-free home projects.
$138.79
Weight1.80 lbs
Weight1.80 lbs
Pros
Ultra-light and compact for tight spaces and overhead work.
Precise 20+1 clutch prevents stripped screws and blowouts.
Efficient 12V system perfect for daily DIY without bulk.
Cons
Not ideal for heavy-duty construction or large fasteners.
Customers find this cordless drill to be a decent tool for basic home projects, with sufficient battery life and comparable power to full-size models. They appreciate its compact size, lightweight design, and ease of use, particularly for small jobs around the house. Customers praise its functionality, with one noting it performed exceptionally well in difficult circumstances.
Customers find this cordless drill to be a decent tool for basic home projects, with sufficient battery life and comparable power to full-size models. They appreciate its compact size, lightweight design, and ease of use, particularly for small jobs around the house. Customers praise its functionality, with one noting it performed exceptionally well in difficult circumstances.
Why it shines for vintage work: This featherweight (just 1.8 lbs!) delivers surgical control where heavy drills fail. Its 20+1 clutch settings let you dial torque down to 2 inch-pounds (perfect for driving tiny screws into brittle antique chair joints without splitting wood). The 7-inch head length slips into tight spaces inside cabinet frames, and the smooth trigger gives buttery speed modulation from 0-350 RPM (critical for drilling into historic materials without tear out).
Real restoration test: I used this to reattach a 1930s Art Deco veneer panel with 3/32" brad point bits. For material-specific recommendations, bookmark our drill bit cheat sheet for wood, metal, and delicate veneers. At clutch setting #3, it drilled clean 1/8" pilot holes without splintering the 70-year-old maple veneer. The integrated LED lit up shadowed drawer interiors, no more fumbling with headlamps.
Key advantages for antique repair:
- Precision torque control down to 2 in-lbs (safely drives #4 screws in dry pine)
- Shortest head length in class (7") fits inside cabinet frames
- Lightweight design prevents fatigue during 2+ hour sessions
- 3/8" chuck holds bits rock-steady even at low speeds (no wobble ruining hole placement)
- Two included batteries cost 60% less than pro-grade 18V spares
One smart buy beats three compromises (this kit costs less than one premium 18V battery but handles 95% of restoration tasks).
Safety tip for vintage work: Always use the lowest speed setting (0-350 RPM) for hardwoods. High RPM creates friction heat that cracks aged wood fibers. Start with clutch setting #5 for pilot holes, then drop to #2 for final screw seating.
2. Ryobi P208 One+ 18V: The "Grow-As-You-Go" Ecosystem (Best Value Expansion)
While not my first recommendation for pure beginners, this platform shines if you know you'll expand into furniture building. Ryobi's 18V ecosystem offers the best value for future tool additions (like their excellent low-vibration oscillating tool for mortising). To see how major brands' batteries and tools interoperate, review our cordless drill ecosystem comparison. But, critical caveat, only buy the PS31 first, then add this later. Why?
- Proven durability: Boatbuilders at Chesapeake Light Craft use these for 5+ years on the same batteries (confirmed by Mark Schade in The Great Boatbuilder Cordless Drill Roundup)
- Low-speed control: Newer models feature near-silent brushless motors with exceptional trigger modulation
- Massive accessory ecosystem: 175+ tools share batteries (including specialty restoration tools like tiny sanders)
But for antique repairs: The base 18V drill is too heavy (3.2 lbs) for prolonged overhead work. Start with the PS31, then add a Ryobi 18V only when tackling larger projects like bed frame restoration. Never buy both at once, that's how beginners end up with "battery bloat."
3. DeWalt DCD771C2: The "Heavy-Duty" Trap (Avoid for Pure Restoration)
Many vintage DIYers gravitate toward this 20V beast (praised in This Old House for durability). But its 500+ in-lbs max torque is overkill for 90% of antique work. Worse: the clutch jumps from setting #1 (too weak) to #4 (blowout city) on softwoods. I've seen beginners crack mahogany chair spindles because the lowest usable setting stripped screw heads.
When it might work: Only if restoring 19th-century timber frames with massive lag bolts (rare for beginners). Even then, use Ryobi's cheaper 18V hammer drill mode instead. My verified tip: If you already own DeWalt, buy their $39 DCN690 12V drill just for precision work, don't risk antique damage with overpowered tools.
Your Restore-Ready Starter Checklist (5 Minutes to Confidence)
Before buying any drill, lock these fundamentals. This transforms analysis paralysis into repeatable wins, just like that student who high-fived after her first pilot hole.
Step 1: Master the Bit-Clutch-Speed Triad (10 Minutes)
| Task | Bit Type | Clutch Setting | Speed |
|---|---|---|---|
| Pilot holes | 3/32" brad point | #3-5 | 0-350 RPM |
| Softwood screws | Phillips #2 | #6-8 | 0-500 RPM |
| Hardwood screws | Square #1 | #8-10 | 0-500 RPM |
| Vintage warning: Never use twist bits on antiques, they tear out aged wood fibers. Always use brad point bits for clean holes. |
Step 2: The Two-Battery Restoration Kit (Budget: $150)
- Bosch PS31 12V drill (kit with 2 batteries) - $149
- $5 brad point bit set (1/16", 3/32", 1/8")
- $8 precision screwdriver set (for hand-tightening final turns)
Skip these: Impact drivers (overkill), hammer drills (vibrates joints loose), or 3rd batteries (you won't need them for 6 months). Start simple, lock the ecosystem, and let skills compound.
Step 3: Your First Project Drill-Down (15 Minutes)
- Clamp workpiece to prevent slippage (use soft jaw pads!)
- Mark hole location with awl (creates starter dimple)
- Set clutch to #4, speed to 0-350 RPM
- Apply gentle pressure (let the bit cut naturally, no forcing)
- Stop 1/2" before breakthrough to avoid exit splintering
Safety checkpoint: If your drill stutters or heats up, stop immediately. Old wood often contains hidden nails or metal fragments. Use a stud sensor first. For a full primer on PPE and safe technique, read our cordless drill safety guide.
Why This Path Prevents Buyer's Remorse (The Long Game)
Vintage restoration isn't about owning the "best" drill, it's about building consistent results with tools that respect historical materials. That hesitant beginner I mentioned? She's now rebuilding a 1920s Morris chair using only her PS31 and expanded Ryobi ecosystem. She avoided the common trap: buying DeWalt's "20V Max" kit because "it's pro." Instead, she started with delicate surface tools that matched her skill level.
The compound effect: Her first $150 kit handled 50+ projects. Then she added Ryobi's $49 oscillating tool for fine inlay work. No battery bloat. No discarded tools. Her ecosystem grew with her confidence, proving that one smart buy beats three compromises. Today she lectures at our makerspace on hand-tool/drill hybrids for antique repair.
Your Next Step: Drill Your First Perfect Hole (Today!)
Don't wait for the perfect kit. Grab these three items now:
- Bosch PS31-2A kit (the only drill you need for 6+ months of restoration work)
- 3/32" brad point bit (for pilot holes in antique joints)
- A $2 pine board scrap (practice on something worthless first!)
Set your clutch to #4, speed to 0-350 RPM, and drill five straight pilot holes. If one wobbles, swap to clutch #5. If it splits, reduce pressure. This is how confidence compounds. In two weeks, you'll be repairing that mission cabinet with calm precision, not white-knuckling an overpowered drill.
Remember my Saturday class mantra: Start simple, lock the ecosystem, and let skills compound. Your antique deserves tools that honor its age, not your ego. Grab that kit, drill one hole, and email me your before/after photos. I'll help you tweak your technique for the next piece. Because in restoration, the first perfect hole changes everything.
Related Articles